
First see this old old blog post about the remotoring and change to the drawbar that I did a few years ago.
I am not a master modeler, but more recently, I’ve been working on changing an old Mantua General Locomotive over to the paint scheme of a US Military Railroad Norris type locomotive. With City Point being my main area of focus, I found some really good images of the Govener Nye, and decided to use that locomotive as my prototype.
The original paint job was severely chipped and probably not very great to start with. I stripped the old paint off with lacquer thinner and then repainted. Here is the result.
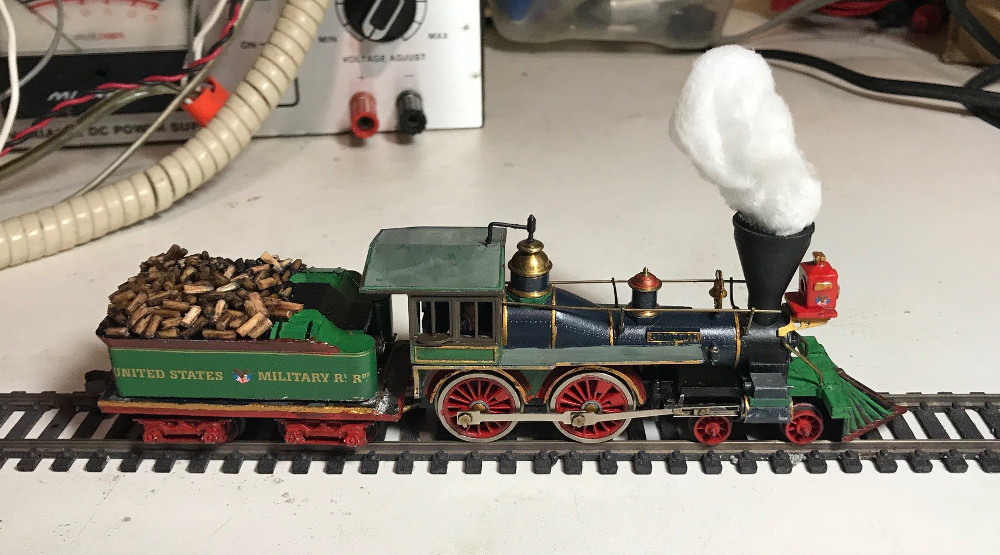
Generic USMRR Locomotive – paint based on Govenor Nye, a Norris built 4-4-0
I used an ancient can of Humrol #96 RAF blue that was left over from my days as a wargamer for the Russian iron, and am very pleased with the result. Other paints were from what I had on hand. I’m not all that happy with the green, but it will do for now. Decals are from Microscale’s Eastern USMRR set.
Besides the repaint here are some other things that I have done with this locomotive.
I added a DCC decoder using a Digitrax DZ-123 Z scale decoder, which can handle the 1 AMP motor. At this time, I don’t plan on adding sound to my Civil War locomotives, thinking that an external sound system will be more impressive. For example, I’m contemplating having an actual whistle that will be controlled with the DCC throttle, just like any other locomotive with a built in sound system.
I also added an engineer to the cab, but he is not very visable.
After mucking around for a bit trying to make the Matua supplied wood pile look more realistic, I ended up replacing the wood in the tender. I scored the sides of some round toothpicks with a fine tooth metal cutting sabre saw blade. Then I stained them and then cut them to size using a end cutting pliers. After positioning them losely on the tender, I used diluted elmers glue to attach them to the top of the tender.
What’s up next? I will add a line so the miniature engineer can ring the bell. I’m considering adding a working headlamp, but that may wait for a later date. I also need to program the speed tables for the DCC decoder. I will probably add a small magnet to the smoke/steam, so it can be removed when the locomotive is shut down, yet be a little more firmly attached when the locomotive is in motion.
Most of what you’ve done seems exemplary, and I don’t mind the green except that it has gone on a bit ‘thick’ to my eye and would benefit from some Gene Deimling-style weathering and general ‘dulling’ of key areas.
The one large suggestion I would make is that the gold lining is presently a disaster. Whether this would benefit from better filing and edge finishing, or is an artifact of inadequate paint coverage or adhesion, I’d suggest a very different ‘technology’ to do the edging: use detail tape on a filed edge to get a clean width, and use a proper set of cements to get the tape to adhere firmly and stay aligned to the edges. I wouldn’t rule out the use of metallic tape for something like the boiler bands, which would prevent the brush marks adjacent to at least one of them, and perhaps for some of the cab trim as well; a perfectly serviceable ‘brass’ could also be applied to ordinary tape using any of the known ‘metallization’ techniques before applying the tape to the model. If the edges to which the tape was applied were given a dark painting, all that would ‘show’ would be the as-slit clean edges of the tapes. A small dot of appropriate clear finish could seal down any beveled or mitered edges or corners before any weathering coats are applied.