Mike's Stereo Realist Fix It Page
(the two most common fixes for the realist)
Disclaimer
I will not be held responsible for any damage that
results from you looking at or following these notes. If you don't
feel comfortable goofing around with this stuff or the possibility
that you could damage something on your camera, just don't do it.
Overview
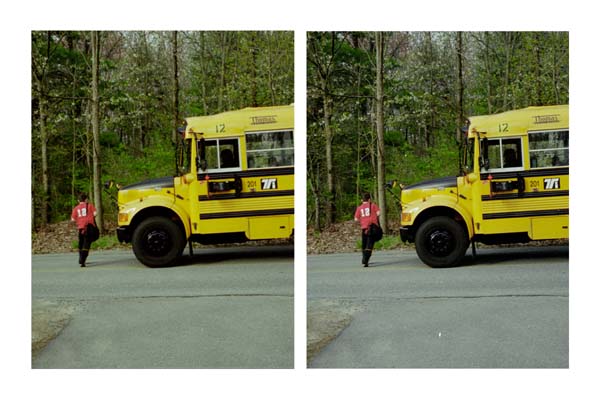
Even in this age of sophisticated high tech electronics, the pictures that
this 50 year old camera takes, can only be described as cool. The
pictures are in an odd format, so ask your processor to develop only, do
not cut or print. Once I dropped off to be sent off to Kodak, with these
instructions. They were so confused by the result, that they didn't
charge me, even though the resulting negatives were perfect. The pictures
themselves are scanned into digital format by a film scanner. I print
in a side by side format on 4x6 inch photo paper. I found a cheap
source of stereo viewers at www.loreo.com, so
I can give away viewers with the pictures.
By the way, I found that working on the Stereo Realist is quite easy compared
to other camera's I have worked with in the past.
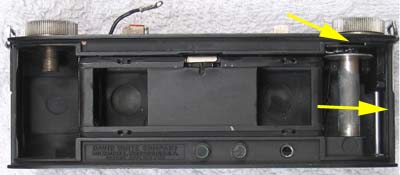
Light leaks
Stereo Realist's are famous for light leaks. Mine had leaks in
two locations as pointed out by the arrows in the picture.
I used a 1.5 volt light bulb wired to an N size battery/holder combination
to find the leaks, in the first place. The battery was placed in
the film cartridge compartment and the light bulb in the take up reel area.
Then the back was put on the camera and I moved to a dark location
to see where the light was leaking out of the camera. The process was
repeated after I added the seals to make sure that the light no longer leaked.
To fix the leak, I used the seal material from a couple of used 35mm film
canisters. Contact cement was used to glue the seal material in place.
I found it easier to seal the leak on the end of camera, if it was
glued on the camera back, not the camera body, itself. When placed on
the body, the back wouldn't close all of the way. Make sure everything
closes up, with the seals in place, before actually gluing them in.
Rangefinder out of Whack
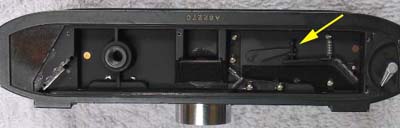
Carefully remove the leather covering the bottom of the camera and remove
the bottom plate. Focus on an item with distinct lines at a distance
that would result in an infinity setting. Tweak the rangefinder adjustment
screw, until the item is in focus. Place a drop of shellac on the screw
to keep it from turning. Replace the bottom cover and glue the leather
back on with shellac.
Back to Mike's Hobby Home Page