You can download this story from my new feature story web page. As well documented as the Apple 1 is, this story contains a few tidbits that haven’t been published before.
Going forward, I hope to add a new story to this page every month or two. These stories are going to a be a little more polished than my blog entries and other web pages.
I just ran across this old image that was used to make a poster for the first VCF that I had an exhibit at. Based on the date on the files, it looks like the poster was designed in 2008.
Apple ][ replica poster
The main thing that struck me is that I can’t believe what I was thinking, selling those kits for only $349! You can’t imagine how much effort it took to gather together all the parts and then assemble kits. Eventually I gave up on the kit idea and just sold bare boards. All told, I think I sold something like 16 boards and kits and kept a couple of boards for myself. I made a little money on the project, but if you counted up the hours and calculated an hourly pay rate, it had to be way below than minimum wage.
You don’t find many electronics kits manufacturers these days. I think the main reason is that it is now actually cheaper to build an electronic item than package a kit.
I am sometimes surprised at how little money that some people ask for bare reproduction PCBs. Sometimes, I see people asking less money than what I paid for those PCBs. I suppose if you really dig around, you may be able to find a fab house in Asia that will make a PCB for almost nothing, but my investigations always showed that for larger PCBs and small runs, the most popular offshore fab houses, really weren’t that much cheaper than domestic ones. Thus, I always have my PCBs made here in the USA.
Quest Components had them and I was able to pick up a few for $8.00 each. I was able undo the work-around hack for the “A” part and the board works perfectly without mods with the non-A part. Quest has both the “A” part and a “P” part, so if you decide to order from them, be sure to order the “P” part.
Today Gizmoto reported on this iPhone enclosed in a case that is supposed to made from a piece of authentic Apple 1 circuit board
The biggest problem with this product is the likelihood that the circuit board fragment is from a reproduction. On that same site are images of what are unquestionably reproduction Apple 1 circuit boards. I’m quite sure about these images since no Apple 1 circuit boards have ever been found that weren’t populated with components.
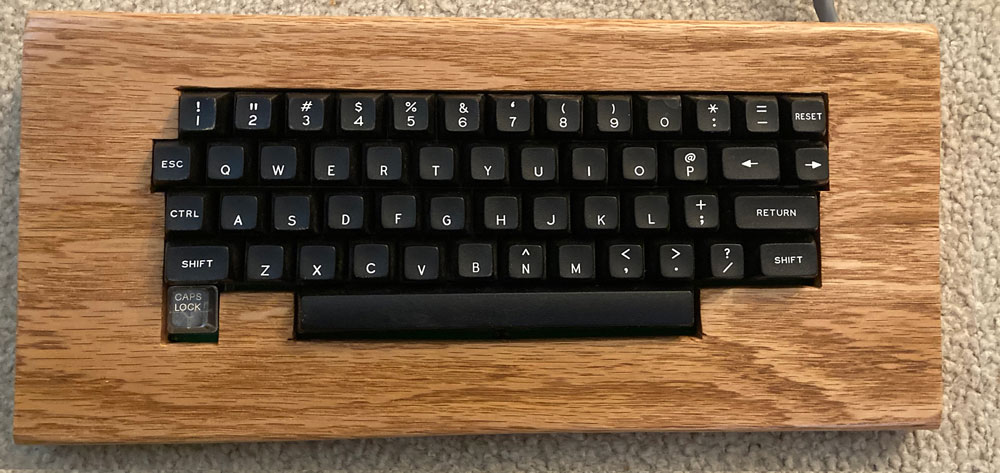
Quite a while ago, Wendell Sander sent me an example of his Apple 1/Apple ][ compatible keyboard design. Over the past couple of years, I’ve used it with my SCELBI as it can also be connected to a SCELBI keyboard interface. I didn’t have an enclosure, but had it mounted on a couple of blocks of wood.
For a long time, I’ve envisioned building a proper enclosure for it. Well, I finally got around to doing just that. I recycled some red oak that I had cut to a bit less than 3/8″ thick and had used for a while in another project that is now not needed.
Keyboard Enclosure
I think it looks quite nice. There is no rear cover, but I suppose I could add a sheet metal cover , if I decided I really needed one.
keyboard enclosure, back
For those that are interested in making their own Apple II compatible keyboard enclosure, the following drawing can be used to cut out the faceplate.
Back in 2017, I started on a hardware manual for the SCELBI computers. This originally was a digital copy of the original SCELBI 8B hardware assembly manual, which described construction and basic operation of the SCELBI 8B CPU. The original SCELBI 8B manual was 86 pages long and did not include any software or information on peripherals. Over the past couple of years, I have greatly expanded this manual. The draft now includes the following sections:
History
Printed wiring board assembly
Chassis assembly
Power supply
Installation and check out procedures
Peripherals
Schematics, parts lists and technical notes
Enhancements and modifications
System software and utilities
My goal, up to now, was to gather as much relevant content as possible and get it into a draft manuscript. At his point, I think I have added most of the content that I think is important into the draft and will now start work on doing a complete job of editing. The goal would be to put the manuscript into a reasonable condition where it could possibly be published. This will take a while, as the document is currently 274 pages long, and up to now, there has been almost no serious editing done.
Back in 2015, I partially described how I used an early Apple serial card in an Apple ][ to provide a “glass” TTY emulation in order to check out some of my SCELBI software and interfaces. Since I don’t have a real TTY, I always had to set up the Apple ][ and download an emulation program via cassette tape interface in order to test the SCELBI with an TTY interface. Over the years, this has been an annoying bit of hassle, mainly because I usually forgot exactly what version of the software that I needed to download, exactly where in memory to download it, and what slot to put the serial card into.
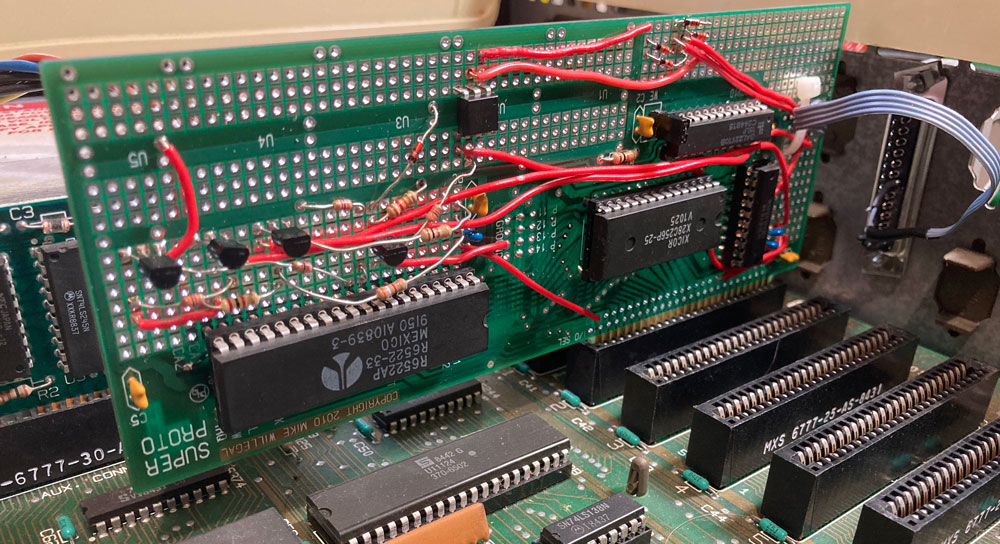
I knew that I could create a turnkey power on and go solution by designing and building a custom Apple ][ peripheral board. I just needed to copy the current loop interface from the Apple Serial card to a Superproto board and drive it with the Superproto’s 6522 VIA interface hardware. I knew I could easily port the program I had already written to run right out of the Superproto’s EERPOM. I first thought about doing this years ago.
Finally I started to do something at the beginning of this year, when I ordered the few required hardware components that I didn’t have in my stash. These parts came in right away, but, until now, I haven’t found the time to build up the board and port the software.
TTY Card
Well, I finally found the time to get this project working. I think the result is pretty cool. To connect a TTY with a 110 baud current loop interface to my SCELBI, I just connect the Apple ][e to a monitor, the SCELBI and power it up. No need to bother with floppy disks or cassette interfaces, or anything else. Since this card looks like a Disk ][ to the Apple, the Apple will automatically boot the TTY application, which resides in the Superproto’s EEprom.
I could potentially add logging, paper tape emulation and scroll back capability to this application, but I probably will not proceed with those ideas, at least anytime soon.
One other thing I might do, is create a version of software that will work at 45.45 baud and the Baudot charactor code, so I can use it with RTTY applications. I have done a simple version of this software for the Apple serial card, so it shouldn’t be too hard to port over. Since the Superproto supports multiple banks of memory in the EEPROM, I can use the same board and just put the RTTY app in a separate bank, and use the bank select jumpers to switch between TTY and RTTY applications.
Someday, I might make a custom card for this design, but I’m not going to do this unless I hear about some kind of demand for such a card.
Let me know if you are interested in seeing more details of the software and hardware design.
Booting the SCELBI without an integrated EPROM boot loader/monitor can be an extremely difficult and time consuming process. The first issue of the SCELBI newsletter described a very simple peripheral that makes this process easier. I’ve known about this simple device for years, but until now, never built one. Well it turns out that I should have built one when I built my SCELBI-8H. It makes for a huge improvement in data entry capabilities of a SCELBI that doesn’t have a EPROM monitor, like my 8H, as it was initially constructed.
SCELBI Fast Loader
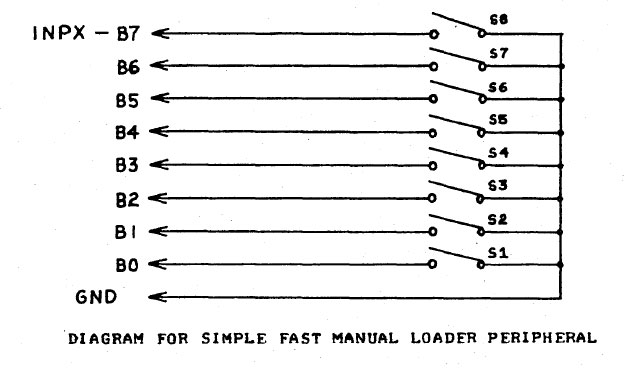
The fast loader peripheral is a simple device that relies upon a tiny four byte long program which can easily be toggled into memory with the SCELBI’s front panel.
The device is connected to any input port with a standard SCELBI peripheral cable. There is already a pull-up on each input, so all that needs to be done, is to either leave the input floating, in which case the SCELBI’s internal pull up resister will pull the input level high or connect the input to ground, which will force the input low. The operator sets each input to a high or low state with a simple DPST switch.
Fast Loader Schematic
The way this peripheral is operated is as follows. Using the front panel, the operator toggles the four byte long, fast loader program into memory, starting at location 0, and then sets the H and L registers to point to where the data needs to be written.
When run, the fast loader program will read the input port connected to the fast loader, writes the data to memory, increments the L register and then halts. Once the program is started, the operator enters a RST 0 instruction into the SCELBI front panel toggle switches. While still halted, the operator enters the data to be written into the next memory location into the fast loader toggle switches. The operator presses the interrupt button on the SCELBI front panel and then the run button. The program will jump to zero because of the RST 0 instruction that is set on the front panel. The program at location zero will read the input port, deposit the data to memory pointed to by the H and L registers, increment the L register and then halt again. The process is repeated until the operator has entered all the desired data into the SCELBI’s memory.
The fast loader program follows. This version assumes the fast loader peripheral is connected to input port zero, but other ports can be used by changing the INP instruction.
Line Addr. CodeBytes Source LineLine Addr. CodeBytes Source Line —- —— ———– ———————————- 01 START:ORG 000#000 02 00-000 101 INP 000 ; read port 0 03 00-001 370 LMA ; save to memory 04 00-002 060 INL ; increment L 05 00-003 000 HLT ; stop
This program doesn’t handle the case of register L wrapping, but a few more instructions could be added to increment register H, if L wraps. Most boot programs should be designed fit into a single page, so this should not be necessary.
Here is a picture of the inside of the fast loader that I built. You couldn’t possibly come up with a simpler design for a peripheral device.
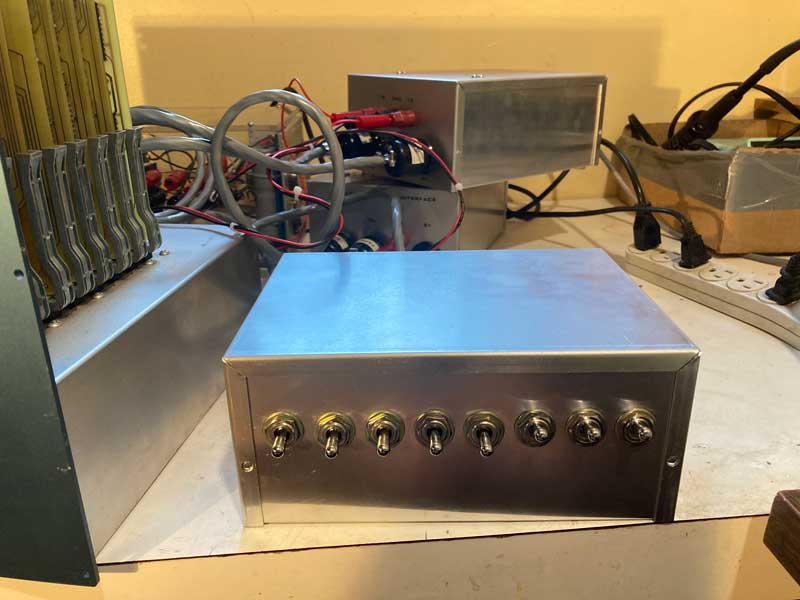
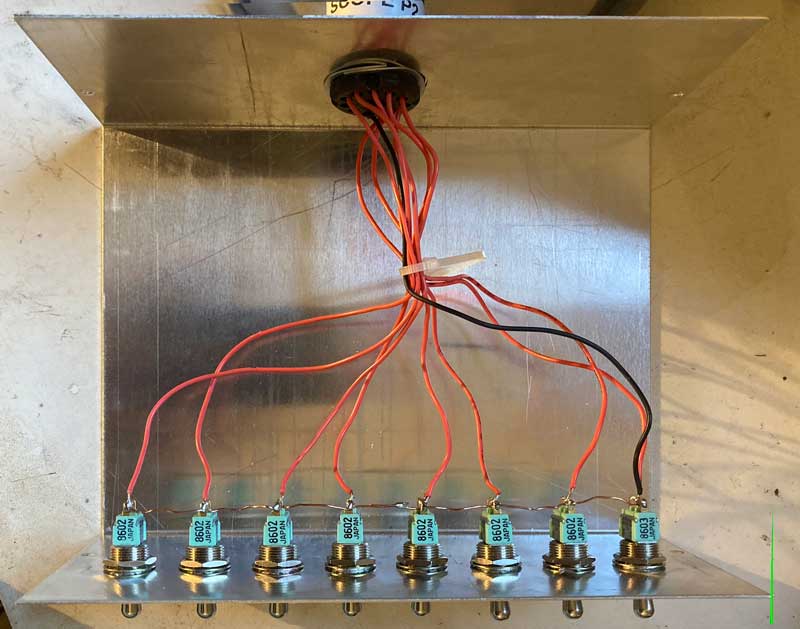
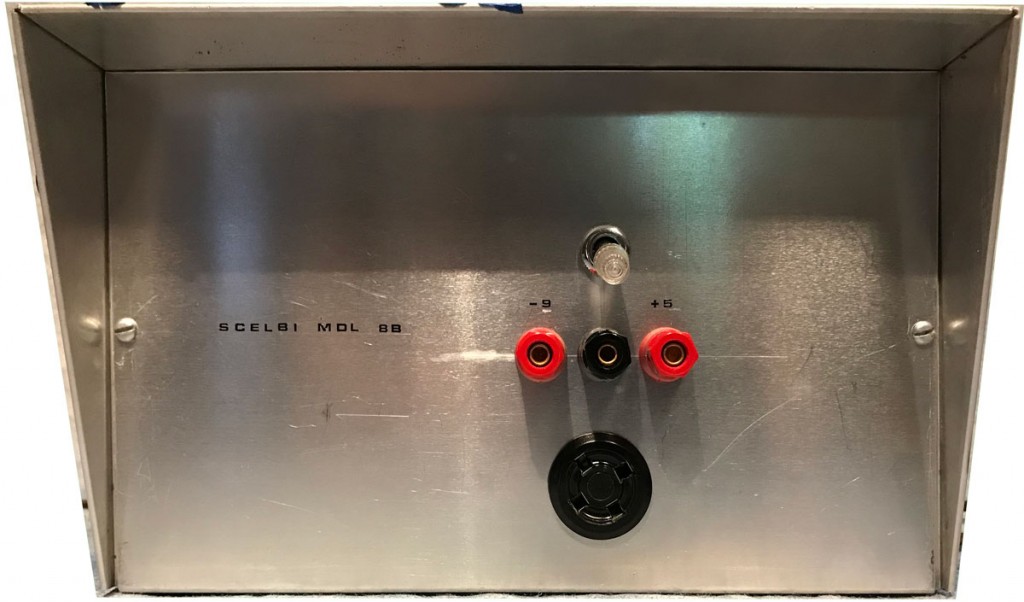
Here is the front of the factory power supply that is part of the SCELBI-8B system described in the last post. A simple on-off switch, three banana plugs/binding posts, (+5 volts/-9 volts/ground) and an Amphehol 4 pin socket for connecting power to the chassis make up the controls and connections on the front. On the back is a fuse and fitting for passing the AC power cord through the back of the chassis.
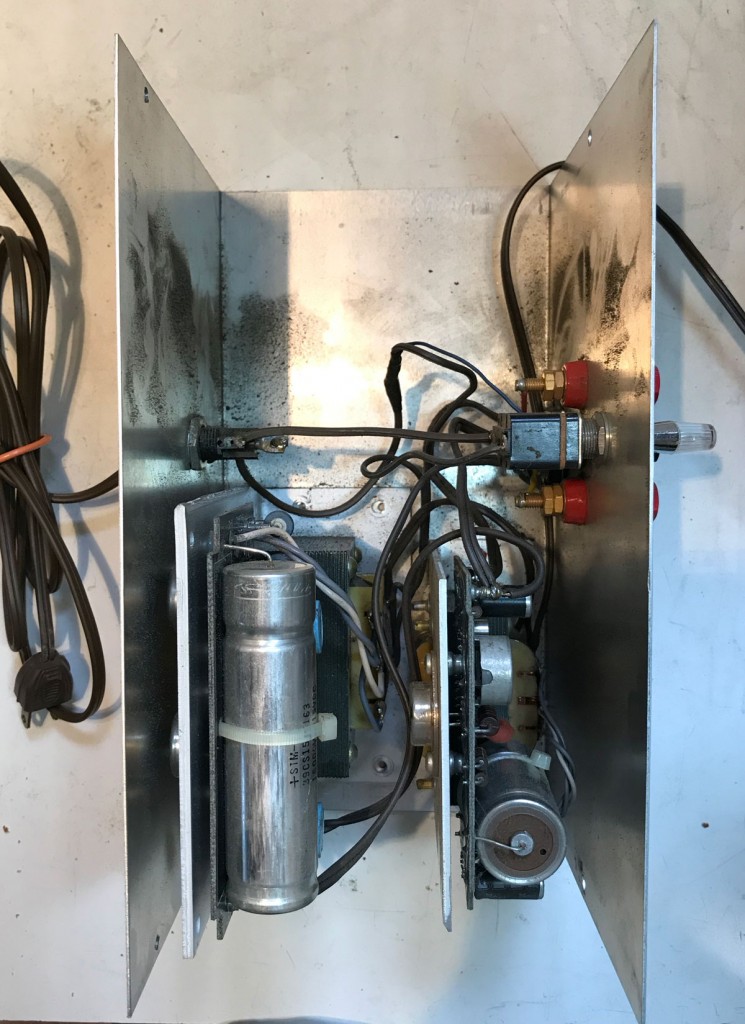
The inside reveals space at the top of the picture for a 110 volt AC fan which is bolted to the cover. The cover has ventilation holes drilled in both ends to allow the fan to draw in cooling air. Two Power-One supplies make up the power supplies. One is 5 volts and the other is a Power-One 12-15 volt supply modified to output 9 volts. The positive output of the 9 volt supply is connected to the negative output of the 5 volt supply which becomes ground for the system. The negative output of the 9 volt supply becomes -9 and the positive output of the 5 volt supply supplies +5 volts to the system.
All in all, the whole thing is an extremely simple affair, the only complication being the changing of a resistor in order to covert the 12-15 volt supply to a 9 volt supply. This unit did not actually use banana plugs for power delivery to peripherals, but ordinary hook-up wire connected to the binding posts.
In my next post I will describe the problem with the power supply and how I resolved it.
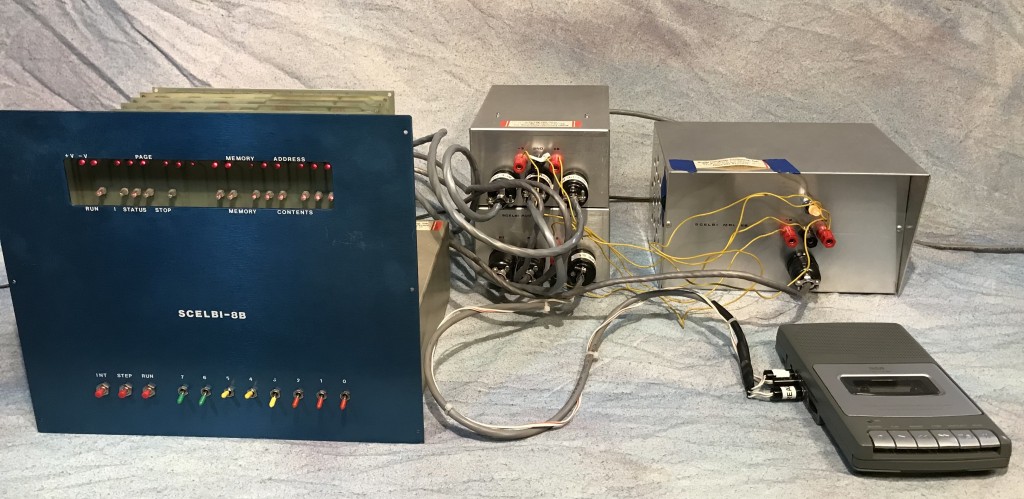
What we have here is a complete, original operating SCELBI-8B. It includes 12K SRAM, 4K EPROM loaded with MEA, a TTY interface, a cassette interface and on the right, an extremely rare SCELBI factory power supply.
I was asked by the owner of this system to get it working and I agreed to do the job. After setting it up, the only problem I could find was a bad smoothing capacitor on the five volt power supply. I will write up the power supply diagnostic process in a future blog posting.
I ran SRAM tests, and a number of applications on this system, including most of the features of MEA as well as SCELBAL. The owner was concerned about EPROM contents, so I wrote an EPROM verification program, which it passed with flying colors. Once the power supply was fixed, the system ran these diagnostics and applications in several sessions covering several days without a single glitch. SCELBI’s usually are pretty reliable machines and this one was no different.
By the way, I will be posting the EPROM verification program at some point on my 8008 application page.
However, there has been one snag. After I returned the system to owner, he reported that it didn’t work. The symptoms sound exactly like the original power supply problem, so I hope that this can be resolved relatively easily.
I really tend to shy away from doing repairs for the reason that a lot can go wrong while shipping an old system around the country. For example, quite a few years back, I repaired an Apple II, rev 0 motherboard which had three different faults. By the time it got back to it’s owner, a forth fault occurred. Even though I did this repair as an experiment and didn’t charge the owner anything, he appeared quite annoyed with me. Fortunately, in that case, based on the symptoms, I was able to correctly guess the root cause of the forth failure and get that machine running again, without having to ship it again.
Despite the challenges associated with repairing old computers, getting a chance to get an original 8B running and document it was too exciting to pass by. Though I have heard of one or two other original SCELBI-8Bs that partly work, this is the only one that is completely working, at least that I know about
Well it’s actually not working at this instant, but I’m certain that with a little more effort, it will be running, again.

![Apple ][ replica poster](http://www.willegal.net/blog/wp-content/uploads/2021/02/apple-add.gif)