
This is a very early draft. Consider it to be full of errors, so compare to original documents that can be found at scelbi.com, before using. The main reason I’m posting this, is that I have created and added a couple of chapters for assembly of the oscilloscope interface. Any original documentation that existed about the oscilloscope interface has been lost. I still need to create a chapter with technical information on the oscilloscope interface, including a bill of materials, schematics and theory of operation, but this is a good start. I also need to add a section on PCB rework for this interface. The other chapters will also get revised, as I find time, with photographs of the boards and any notes or errata that I have discovered.
SCELBI Front Panel redo in progress
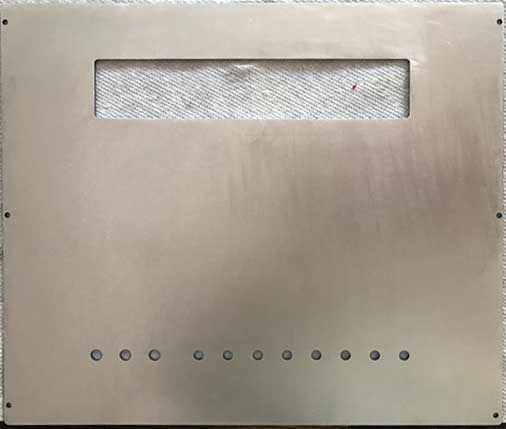
SCELBI Front Panel
This SCELBI front panel had some issues, so I decided to remove the existing anodizing, polish out the defects and completely redo it. Removing the anodizing took about an hour. There is a term, “hard anodizing”, and I found out why. It was clear that the anodizing clearly made the surface extra hard. I still need to go over this panel and remove any remaining imperfections before redoing the anodizing. I have a few more panels that I will need to polish out, before taking the batch back to the anodizer for the redo.
A CHM Youtube Video Worth Watching
The CHM’s youtube channel has this video, which caught my attention.
https://www.youtube.com/watch?v=3Z8XrC3kLJM&index=8&list=PLQsxaNhYv8dZMhpT8-934UPMdtho7G2_W
I’ve always been an advocate for the behind the scenes “little guy” that do 90% of the work that really make new products possible. My mom taught me, when I was little, that “words are cheap”. The same can be said for the new ideas that lead to breakthroughs in technology. There is always a foundation for these new ideas and they usually aren’t giant leaps, by themselves, but almost always, incremental steps in understanding.
In my mind, the hard part, isn’t coming up with the idea, but implementing it. In fact, many products are described decades before they can be implemented.
The stories on Andy Hertzfeld’s folklore.org website, demonstrate the hard work that goes into implementation, as well as anything that I’ve ever seen. The thing to understand is that the effort that went into making Macintosh, isn’t unique, but rather the norm for almost all of the gadgets that we take for granted, these days. How do I know this, you may ask? Well, I’ve been involved in new product development for something like 38 years. Some of the products that I have worked on have been failures, but many of them, successful. In either case, it’s always a struggle for those involved. A rewarding struggle when it goes right, but still a struggle.
It seems Thomas Haigh understands this. I’ve ordered his book on Eniac and will write a review after I read it.
Thomas’ comments on Isaacson’s book “The Inovators”, made me pull out Isaacson’s book, “Jobs” and review the sections on Apple 1 and Apple II. I think I understand those products and what went into making them, very well. Thomas’ comments made me want to review the book for faults. I knew that Isaacson had Job’s and Wozniak soldering Apple 1’s, which was incorrect, but wondered what else I would find, if I reviewed those sections. Before I comment on what I found, I will say that I greatly respect anyone that can write such an engaging book, as I don’t have the patience or talent to do it.
Here are the mistakes I managed to find during a quick review of those sections.
Though there are no real mistakes with the Apple II section, there are, in my mind, serious omissions.
I understand why Isaacson, in his story, emphasized Job’s interaction with a number of significant personalities. It is a shame that the struggle to develop a new product by a team of talented engineers gets so little “ink”. I also wonder how accurate the depictions of the interactions between the significant personalities really is. It seems that, in terms of the technical stuff that I understand pretty well, Isaacson would grab a fact and elaborate upon it, kind of putting his spin on it, without doing serious fact checking.
In any case, it’s an entertaining read, that I recommend, in spite of the errors and omissions.
New (old) Keyboard Design
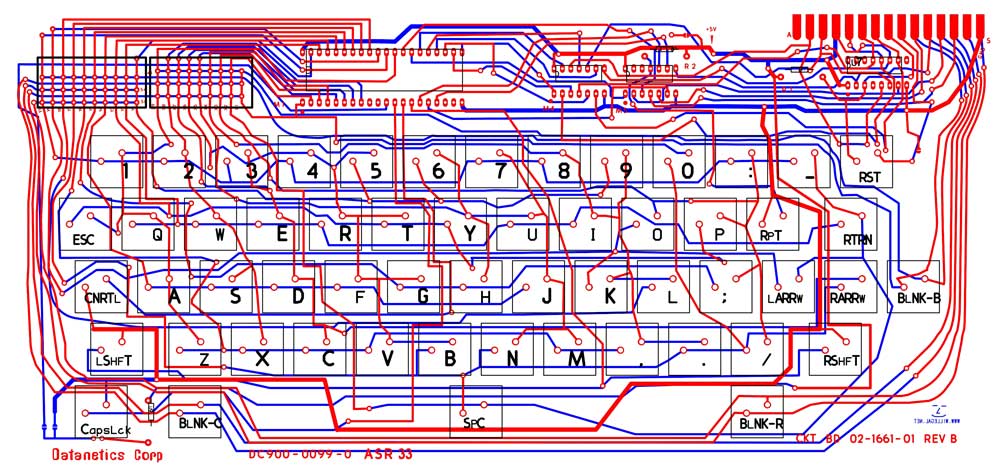
Keyboard Layout
Here is the current state of my new parallel ASCII keyboard layout. It is setup to use Cherry key switches and the encoder is a 40 pin AVR micro controller. I plan on making the encoder/controller key mapping configurable through the keyboard itself. It should work nicely as an Apple II/IIplus replacement keyboard, an Apple 1 keyboard, or a more generic ASCII parallel keyboard. The strobe will be configurable as a pulse with configurable duration, requiring an ack, or simply follows state of keypresses. The later mode will only keep strobe active and data output valid while a key is pressed. Like Wendell Sander’s design, the power light doubles as a caps lock key. Note that I plan on making the power/caps lock light configurable to indicate general power/health or caps lock status.
Due to making configuration through keypresses, most of the solder jumper locations will go away, but I might need to leave the reset option in the layout. I still have a lot of work to do around the micro-controller section plus a lot of design verification. I also intend to retro-ize the traces to make them look more like a hand laid layout that could have been done back in the 70’s.
In keeping with the original Datanetics rev D., upon which this is based, I may leave out the silk screen layer on the final PCB.
New SCELBI 8B Video
The following link will lead you to a video showing off many of the components of a SCELBI 8B with audio tape, keyboard and oscilloscope interface. It starts with a description of each individual module. Then the components are all “hooked up”. The systems is powered up and some of the capabilities of the SCELBI system are demonstrated.
A Brief Conversation with Woz
During the Apple/Homebrew reunion, having never met him before in person, I briefly introduced myself to Woz as the guy that makes those Apple 1 clones that he always signing. He said, “nice”. He was surrounded by a crowd of people, so I let it be at that, and moved on. At least I had introduced myself.
Later on, as I was talking to Daniel Kottke, whom I have known for several years, Woz came over and joined us. We talked about that small change that he thought could add a color to the Apple II. I mentioned that I tried to make that change, but couldn’t make it work, right. He said he knew that. I was a little surprised by this reply, since I don’t think I ever reported that I had spent time experimenting making that change, but failed to make it work well. Maybe, I had emailed him my results and then forgot about it, I don’t know.
Woz also talked about a change he thought he could have made on the Apple II, that would have saved a chip, but required more complicated software in order to implement video support. I’m not sure what that change would be, but I’m thinking that creating an incompatible Apple II to save a chip isn’t anything I’ll be working on, at least in the near future.
Woz talked about the video system on the Apple 1. He says he copied it from some terminal product, clearing up that point, once and for all. Part of this video system has a rather complicated state machine that implements the carriage return logic. Woz admitted to Daniel and I, that he never understood that logic. In return, I admitted that I never understood it either. Actually, I was probably being a bit humble, as I understand the concept of that circuit, but never completely understood the details of the implementation. I expect he was saying the same thing.
Woz finally mentioned that there was one part of the Apple II design that didn’t meet timing specs of the chips. He then said that he knew it, but never told anyone. He was counting on the conservative specs of the chips involved from turning this timing violation into a real problem. I think that he was right, as I have never heard of any timing issues on the Apple II, actually causing problems.
I wonder if Daniel and I were the first to ever hear this confession, as I don’t recall hearing about it, before. Anyway, this confession reveals some of the difficult decisions that design teams, even the best, have to deal with on a daily basis. Sometimes these sorts of decisions come back to haunt us, and sometimes they don’t. The reason that engineers sometimes hold back on reporting latent issues, is that openly reporting issues may cause endless debate within the design team and possible delays on the project. I’m sure that Woz would have reported it, if he thought it was going to be a real issue.
By the way, I don’t advocate holding back information from your boss, I’m just saying that it does happen and why.
Meeting Woz in person, was a real pleasure. He is a great guy, exactly the same in person as when on stage or virtually, via email.
Apple 1 – byte shop numbers
On the back of quite a number of original Apple 1s is scribbled with a felt tip marker, a number, typically 01-00XX. For a long time, it was said that these were supposed to be added by the Byte Shop. A couple of years ago, I ran across a machine purchased from Ray Borill’s Data Domain shop in Indiana, that also had those numbers. This and the fact that the numbers go higher than the 50 that were supposedly sold to the Byte shop made me question the origin of those numbers.
I had recently heard from a source that Data Domain had purchased machines from the Byte Shop, which could explain how those numbers got on Data Domain computers.
At last week’s Apple and Homebrew computer club reunion, I happened to start talking to Thom Hogan, who was associated with the Data Domain shop back in the day. I asked him about where they obtained their computers. He said that at some point, they bought Apple 1’s from the Byte Shop, because that Apple would not sell them more computers. They needed more Apple 1’s, because they were selling them into practical applications. They even had one installed at Churchhill Downs, site of the Kentucky Derby. He thought that it was installed near the starting gate for some purpose, though he didn’t exactly remember what it’s function was.
This explains why the Byte Shop serial numbers could be found on systems purchased from the Data Domain. These two independent sources pretty much remove my uncertainty about the source of the “Byte Shop” numbering.
How I came to be at the Homebrew/Apple Reunion, LCM+Labs, 2017
A few weeks ago, I was invited to a “Homebrew/Apple reunion event” at the Living Computer Museum and Lab. Here is some of the text from the invitation.
Living Computers: Museum + Labs, founded by Paul G. Allen, would like to invite you to a very special private event.
We are celebrating the opening of our latest exhibit, which follows the first 20 years of Apple Computers, by throwing a party for those who were there. This is a unique opportunity to reconnect to the people, and computers, that you remember from the start of the personal computer revolution.
I was given no additional information about who was coming or since I never worked for Apple Computers, even exactly why I was invited. However, without hesitation, I accepted the invitation, and made plans to attend.
Fast forward a few weeks, to just a few days before the event. Someone noticed a little reported article announcing that a very special Apple 1 was going to be on display at the LCM+lab’s new Apple exhibit and brought the article to my attention. This happened to be the computer that I reported in a blog posting a few years ago, though I never updated my Apple 1 registry with this unit. I didn’t think a whole lot more about it, as I have been involved in communications with many Apple 1 owners over the years.
I arrived in Seattle on Tuesday afternoon for the Wednesday evening event, still unsure why I was invited, and who else would be there. A small bus picked up about 8 or 9 of us from the Hotel late Wednesday afternoon to take us to the celebration. I could not identify anyone on the bus, though everyone was very friendly and in good spirits.
When picking up my name tag, I saw an impressive number of familiar names on the tags that hadn’t yet been claimed, including Woz and Paul Allen. Anyway, I introduced myself to a number of people and had some interesting conversations, including a chat with Lāth Carlson, executive director of the museum. However, I still was unsure why I was invited. I was taking the approach of “when in Rome, act like a Roman” – in other words, I was just trying to fit in and not ask too many questions.
After a bit, we were led through a behind the scenes tour. As we were watching the Bendix vacuum tube computer G-15 being demonstrated, someone that I didn’t recognize, saw my name tag and said “Mike Willegal is here”. The people identified themselves as the Hutmacher family and told me that they had donated the computer to the museum. The donation was kept a secret, which is why I wasn’t told anything. The Hutmacher family had asked the museum to invite me to this celebration, since, with the help of some acquaintances I had with early Apple people, I helped them verify the history of the computer and also pointed out that it belonged in a museum. The mystery of why I was there, was solved.
The fun part of being identified by the Hutmacher family is that they made a big fuss over me, and some of them had their pictures taken with me. During all this fussing over me, Chris Espinosa, who I had never met and only could identify by the name on his badge, looked on from the background with a puzzled look on his face. I could almost see his brain working – who is this guy that they are making such a fuss over. After the Hutmacher family moved on, I introduced myself to Chris Espinosa and explained what had happened.
Lastly, kudos to the Hutmacher family, a very special group of people, for putting a very special Apple 1 into very good hands.
One of WOZ’s Wonder Powers…
Do to the acts of an extraordinary generous family, I was invited to a private gathering of micro-computer legends at the “Living Computer Museum” in Seattle, earlier this week. The gathering included a number of people that were involved with the Apple 1 while it was still based out of the Job’s home and others that were involved in the early days of the personal computer revolution. It was a gathering that, as long as my brain is functioning, I will never forgot. During this event, I learned several little stories and will share them in the coming days on this blog. Here is the first story.
While several of us were admiring the original Apple 1 that will be available to visitors to the museum to use, we discussed how it was being booted with the museum staff. Inevitably, the topic turned to how WOZ used to enter the 4K of BASIC object code by typing hex codes using the Apple 1 monitor. Several of the people there, said they witnessed him do it, and confirmed his amazing prowess at data entry through a keyboard.
Let me tell you, when I first built an Apple 1 clone, I tried to replicate the feat and gave up after screwing up a few hundred bytes worth of input. This was so difficult for me, that I found it hard to believe that it could be done. At the time, I sent an email directly to Woz to ask him about it. He responded that he did it all the time.
I can’t find any blog post that reported this exchange. I may have made one or perhaps, I was so dubious, that I decided to file the whole episode away. Anyway, hearing directly from a couple of eye witnesses has eliminated any remaining doubt and I’m rectifying any omissions in faith by making this post.
I can’t remember hearing about anyone else achieving this, but assume it’s possible. I’ll bet it’s not something that anyone else has done repeatedly. This is a difficult feat, and the fact that WOZ did it repeatadly makes it simply amazing.
VCF east wrap up and Oscope improvement
I think my SCELBI 8B with oscilloscope display, cassette and keyboard went over pretty well at VCF east. I did have some issues with stability of the oscilloscope display. It was very sensitive to positioning of the cables and the scope output would sometimes get flakey if you just touched the cables.
One thing that has concerned me from the beginning of the scope project, is the nature of the grounding of the different power supplies, especially the the +/- 18 volt supply for the scope op-amps. As the data cables from the main chassis include a ground wire, I knew I had potential for a ground loop problem. I think that is what was troubling me at VCF. This week, I disconnected the digital ground inputs that were coming in with the data lines. I was using them as inputs on half the strobe input gates as mentioned in a previous post. Instead I connected the inputs of those gates to the local ground which means that ground now only has a single path back to the main +5/-9 supply. It seems to have helped. I need to do some more testing to be sure the problem is totally solved, but so far, this solution looks promising.